Costa Rica
Workflow is important for every photographer. Designing an efficient system to download, cull, develop and backup images is central to all digital photographers. Everyone’s workflow will be different depending on their situation. As long as it works for you, then that is what matters. Often we can improve our workflow by learning quicker ways to do things, and better organizational methods. Many photographers rely solely on Lightroom, so I will use LR for this first workflow process. My next post will describe a faster workflow, and the one I use daily. But this workflow uses Photo Mechanic, an additional piece of software. One last note. I use Lightroom Classic on a desktop. Lightroom mobile isn’t practical for huge image databases, the cloud storage costs would be astronomical for a 56 terabyte library. And if I need to share images with a client, Lightroom Classic offers an easy option.

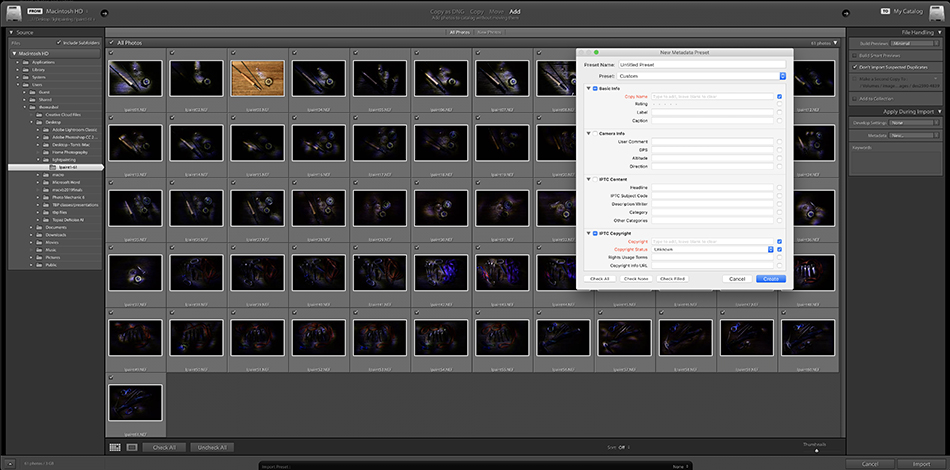
1. Download images to the hard drive where the images will alway be. There are a few really important aspects to this process. First, I am not importing images using Lightroom. I am downloading the images onto an external hard drive connected to my computer, and the images will stay there permanently. I download images to a G-Technology G Speed Shuttle 4 drive system that is configured to Raid 5. All this means is that the disks are automatically backing each other up so if one fails I don’t lose a thing (so already I have a redundant system). Once the images have downloaded, then I open LR, choose ‘Import’ and ‘Add’ the images to Lightroom. I normally use small previews to speed up the time (choose this on right side of import dialog box). You can use larger previews, but this takes more time and drive space. Most importantly, if you are only going to work on a few images, why generate large 1:1 previews when you won’t even use them. I can cull just fine using Minimal previews. During import I will add basic IPTC data (copyright etc..) and possibly a few generic keywords that would apply to all the images. Remember, image searches are only as good as the data tagged to the images. Downloading once to your main computer solves one fo the biggest questions I get on workshops…how to transfer your LR files and edits to your main computer from your laptop you use on the road. More on this topic in Question #1 below.
2. Cull the images. Okay, the images are in Lightroom and downloaded to the hard drive where they will exist. Next, in Grid view, I start culling the images. I normally enlarge the previews so I can view them without having to enlarge each shot. If I can’t figure it out from the preview, then I will enlarge the shot for a closer look. My culling is very simple and fast, no star or number ratings. Simply ‘P’ to pick an image, or ‘X’ to delete a shot (from the drive entirely when prompted by LR). Picking the image flags the shot, making for easy searches using the ‘flagged’, ‘no flag’ or ‘all images’ search located in Grid View. If I am not sure about an image, I will pick the shot in case I might want it later. I delete the rest.
3. Make ‘Best Images’ Collection. Collections are a terrific feature in LR, and a great way to organize your best shots from a shoot for future use. Now that I have culled the bad images out, I do another pass a pick the images that are the best, and ones I might develop. I am pretty harsh with my culling so what is left will be a very small fraction of all the images I originally took. Making a collection doesn’t take much time. What’s great about LR is you can come back to this shoot years down the road and go right to the collection with your best images.
4. Develop the chosen few. With my favorite images loaded into a collection, I decide on which images to develop. Once I have developed the shots, I export the images. The final export images may be low res jpegs for the web or high res files for a client. But LR will remember all my actions in the Develop module so I can export again and again using different flies sizes.
5. Backup. My images have already been backed up twice using a RAID 5 drive system. To back them up again I have a second RAID 5 drive, which is stored offsite. A great option for smaller image libraries might be online backup like Backblaze. Once again, this just doesn’t work for a huge image library, but might work great for a lot of photographers with reasonable image libraries (yes, we shoot way too much here).
This is my LR workflow, and there are countless other ways to do it which will work great for other photographers. There really isn’t a right or wrong answer here, just find a system that works for you. If you have more time, or shoot less, then maybe you like to use star and number ratings. Or maybe you make multiple collections. This is all fine…if it works for you, fantastic, and you will be even more organized down the road. Lightroom offers many ways to edit, just don’t get distracted, stay focused on the good images!
A few questions arise using this workflow.
Question #1. If you don’t download your images to LR while on the road and wait to do it on your main computer at home, how do you develop images on the road? This is the big question! Simple answer…I use Photo Mechanic to view my images on my flash card and only download the few I want to develop onto my laptop. I use Photoshop (it comes with your LR subscription) using the RAW editor…the exact same one Lightroom uses. The buttons and layout are different, but all the tools you know in Lightroom are there! Don’t be intimidated by Photoshop, just use the RAW editor like you do in Lightroom. For backup on the road I download my flash cards to portable drives (very small and affordable these days). I also don’t reformat flash cards on the road, we have plenty for our shoots. Your flash card gives you another form of backup. Any work done on the road in Photoshop is saved via a sidecar file. I honestly don’t do much heavy laptop editing on the road. I would much rather do it on our larger iMacs with better color calibration in more controlled conditions in the office, especially if it is for a client. When I need to show clients over drinks images from the day’s shoot, we use Photo Mechanic to browse before download and quick edits as described above. I can show the images quickly as a slideshow in Photo Mechanic.
Question #2. How can you have photos edited and on your phone within 10 minutes of getting to your hotel room? It’s magic! Or in this case, it’s Photo Mechanic. I can tag photos in camera while shooting during the day, and Photo Mechanic will recognize them at ‘tagged’. By simply viewing the images on my flash card (not even downloaded to my computer), I go to the tagged shots, download them, and do quick develop steps in Photoshop and save it as a jpeg. If fact, using the ‘Auto’ setting in PS, sometimes I barely even need to tweak the sliders…super fast! I’ll talk more about Photo Mechanic on my next blog. But for the fastest workflow, Photo Mechanic is the way to go.