 I shoot a lot of travel photography, and at presentations folks are always interested in how ‘you got that shot’. My first answer is you just have to get out and shoot. It doesn’t matter if you are at your local park or on the other side of the globe, you won’t have great chances of getting ‘the shot’ if you don’t get out and shoot. Sleep optional.
But’s let say you are on a trip, and you are looking for some guidelines on how to produce better travel imagery. I’ll be posting some of the techniques I use on the road to create better travel in my next series of blog posts. But to start things off, I’d say just wait for it….
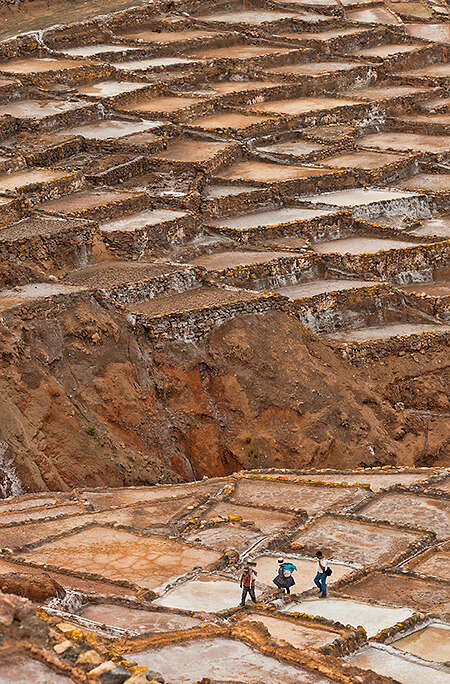
Recently I was traveling through Maras, Peru, noted for the salt ponds locals use to harvest salt. The colors and shapes of the salt ponds are a photographic dream come true; graphic shapes and colors packed into a narrow valley. Just shooting the shapes resulted in strong graphic images. But the shot needed something else. In this case, pattern is interesting, but pattern interrupted in more interesting. Some local workers were in the ponds, but just not in a great spot for a photograph. If these workers would just line up with a good section of the ponds, their shapes would add perspective to the shot, and break up the pattern of rectangles and draw the viewer into the image. So travel technique number one, just be patient. Many situations you can’t control (like directing your subject where to stand), so be patient and anticipate where your subject might go. Look for interesting compositions, and imagine what they would look like if a subject came through that incredible composition. And your subject might be a person, or it might be wildlife, cars, planes, boats…any subject matter that adds to the shot.
Lucky for us these workers decided to walk through the salt ponds to another location. We tracked their movement, and saw they would walk through a terrific composition. Using a 70-200mm F4 to compress the scene vertically, all I had to do was wait….and hit the shutter at the right moment.