You might have noticed in the last months that there is a new profile option in Photoshop and Lightroom Classic, Adaptive Color. I had a few questions about it on my last workshop, so here is a breakdown of what is it, what it does, and some pitfalls when using it.
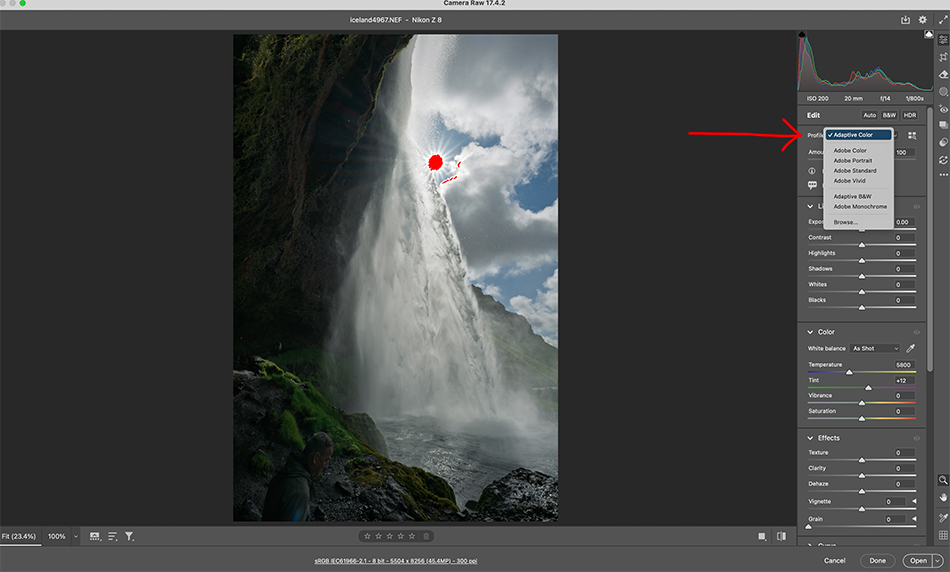
Adaptive Color is the latest application of AI to our set of editing tools, in this case profiles. First, remember that profiles are non-destructive and give us a starting point for our editing, versus presets which actually adjust slider positions (so we are no longer starting at zero). I start my editing with choosing a profile, often Landscape for many of my images since I like saturated colors. For portraits I might choose Adobe Color to start more neutral with my skin tones.
What makes Adaptive Color different? Using AI and machine learning, the profile will correct color and brightness values selectively in the image, not just a full even application like a normal profile. Probably the biggest difference you will see is when applying Adaptive Color to high contrast images, or images with bright skies and dark foregrounds. Adaptive color will bring down the brightness of the sky while affecting color in the foreground. Also, there is a ‘Amount” slider when using Adaptive Color to let you adjust the effect. And for those BW conversions, there is also an Adaptive B&W option. Adaptive Color only works on RAW files at the moment.
Does it work? Yes, Adaptive Color can really look great on certain images, but with others you won’t see much of a difference. Choose some images and try it out. I was impressed with results in images with bright skies, but other images I still liked using the Landscape profile. Color is subjective to a degree…choosing a profile is like choosing slide film, do you want saturated colors using Fuji Velvia, or more neutral colors using Fuji Provia film.
Are there any issues using Adaptive Color? There is one issue you might run into. If you use Adaptive Color, and then retouch and remove objects, you may see a ghost like version of the object you removed. To fix this in your raw workflow, make sure to remove objects first, and then apply Adaptive Color. The other big mistake is using Adaptive Color, and then hitting the Auto button to set sliders. You will get a prompt from Adobe telling you this is a bad idea. Using the Auto button after Adaptive Color results in an over processed photo, and doesn’t look good. So if you like to use the Auto button as a starting point for your sliders and editing, choose another profile.
I find myself trying Adaptive Color on a lot of my images, and some look great. Others I stick with different profiles, and I regularly hit the Auto button to start my editing and see what that looks like. Adobe has given us another AI tool to fine tune our editing, an option to consider with your RAW workflow.